Sunday, March 28, 2010

A Tips to Create a Function to Convert Numbers into Roman Numerals


To create a number of letters we often use roman numerals to indicate the month of making the letter.For example, the letter number is '001 / Int/III/2010' where the symbol 'III' indicates that the letter was made in March 2010.

For this we need a function that can convert an integer number from 1 to 12 into roman numerals. In the Visual Basic programming, we can easily create such a function. Well, here we'll show an example program to create such functions, as well as examples of how to use it.

  • First open your VB program and select standard exe form


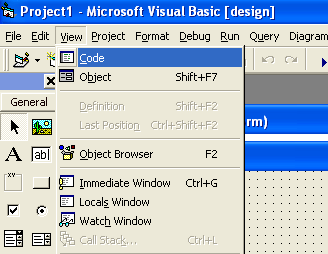
  • Click the View menu


  • Click the Code menu


  • Write the Visual Basic (VB) program code below
    Function IToR(i As Integer) As String Dim s As String s = "I II III IV V VI VII VIIIIX X XI XII " IToR = Mid(s, (i - 1) * 4 + 1, 4) End Function


  • Click the View menu


  • Click the Object menu


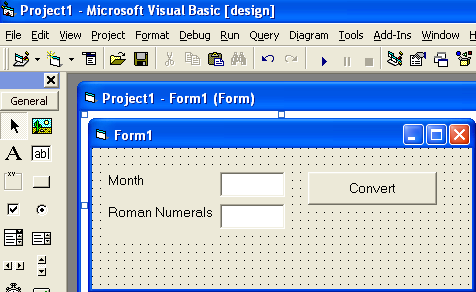
  • Put two label controls, two textboxes and a CommandButton to the form


  • Change the Caption of first label into 'Month'


  • Change the Caption of second label into 'Roman Numeral'


  • Change the name of the first textbox into 'txtMonth'


  • Change the name of the second textbox into 'txtRomNum'


  • Remove texts on the first and second textboxes


  • Change the name of the CommandButton into 'cmdConvert'


  • Change the CommandButton caption into 'Convert'
    So your Screen design will look like the image below:


  • Double click CommandButton 'Convert'


  • Write below Visual Basic (VB) program coding
    Private Sub cmdConvert_Click() txtRomNum.Text = IToR(Val(txtMonth.Text)) End Sub

    Okay, you have completed the program
    Now it's time to test


    • Run your program
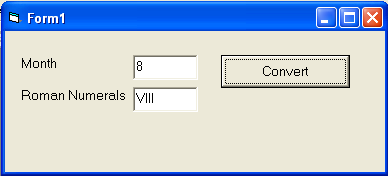
  • Type a number such as 8 in the first textbox


  • Click CommandButton 'Convert'
    Consider the results


  • Thursday, August 20, 2009

    With...End With Statement to Set Object Properties in VB6


    How to Set Object Properties using With..End With
    In the earlier posting I have written that you can set object properties in two session, at design-time and at run-time, although some object properties can be set in both run-time and design-time, other can be set just in design-time, and onother can be set just in run time.

    When you set object properties maybe you need to several properties at once, for example you want to set the properties of TextBox as following:
  • set font to Bold mode
  • set Font Size to 24
  • set the text with a value "Set Object Properties"

    So you can do with the following coding:
    Text1.Font.Bold = True
    Text1.Font.Size = 24
    Text1.Text = "Set Object Properties"

    However to make it easier to read, and easier to understand, you can use With..End With statement to set several Object Properies.
    You can use below code statement:
    With Text1
    .Font.Bold = True
    .Font.Size = 24
    .Text = "Set Object Properties"
    End With

    Example:
    Create a screen design like below image:
    How to Set Object Properties using With..End With
    Note: Set property "Multiline" of Text1 and Text2 to "True".

    Double-click command1 button.
    Write below coding:
    Text1.Text = "One by one set object properties"
    Text1.Font.Bold = True
    Text1.Font.Size = 24
    Text1.FontUnderline = True

    Double-click command2 button.
    Write below code statements:
    With Text2
    .Text = "Using With..End With to set object properties"
    .Font.Bold = True
    .Font.Size = 24
    .FontUnderline = True
    End With

    So your coding should like below listing:
    Private Sub Command1_Click()
    Text1.Text = "One by one set object properties"
    Text1.Font.Bold = True
    Text1.Font.Size = 24
    Text1.FontUnderline = True
    End Sub
    Private Sub Command2_Click()
    With Text2
    .Text = "Using With..End With to set object properties"
    .Font.Bold = True
    .Font.Size = 24
    .FontUnderline = True
    End With
    End Sub

    Now run your program, click command1 button, and then also click command2 button.
    Your program sholud like screenshot in the top of this posting.


  • Wednesday, August 19, 2009

    How to Place Controls into Form in VB6 Programming?

    Visual Basic Toolbox and Form
    In the previous posting I've told you that one of Visual Basic Development Environment's element is Toolbox, that contains controls. And another element is Form Design window (Form). You can place controls into your Form to build your VB application.

    Now, how to place controls from Toolbox into your Form? Ok, it's just a simple way to do that. You just click, drag and drop the control you want. Or also you can double-click the icon Toolbox of the control you want.

    There are two manners to place (add) controls to a form. The first manner is double-click the Toolbox icon of the control you want to add. In instance it will place the control with default size in the centre of active form.
    Control placed in the center active form

    When you adding more than one controls with this way, they will be placed on the top of each other in the center of the form. Then you can reposition/rearrange them into new place you want in the form.

    The second manner, you can follow below steps:
  • First, click on the Toolbox icon of the control you want (for example TextBox control)
    How to add control to form - Click icon you want

  • Place your mouse pointer on the Form (the pointer change to crosshair / + sign)
  • Position the pointer in the place where you want the upper left corner of the control
  • Click your mouse, hold, and drag (so your pointer draws a rectangle that indicate the size of your control)

    How to add control to form - Drag your mouse

  • When your control is correctly sized, release your mouse, so the control now appears on your Form
    How to add control to form - Release your mouse

    After you add controls to your form, you can reposition them to new location in the form, and also you can resize them according to your need. That are the way how to add / place control to your Visual Basic form.

    Ok, I think you get it. And I'll write another Visual Basic tips in the next posting.


  • Visual Basic Code Editor Window

    Visual Basic Code Editor Window
    In the earlier posting I've told you that a VB Project maybe contains one or more files like form, module, and so on. One form usually contains one or more controls. However a form with it's control contained on it can't do anything without code statements (programming code) that associate with them. And a module also contains one or more statements.

    A place in VB Development Environment where you can write your VB code statements (programming code) is called Visual Basic Code Editor Window. It's also known as the Code Window. A sparate Code Editor Window is displayed for each form or module in your project, making it easy to organize, view, and navigate.

    There are two drop-down lists at the top of the Code Editor Window called Object List and Procedure List.The Object list contains a list of all the Contols that exist on the form. When you selectiong a control name from the list, the Procedure list shows all the events (actions) for the control.

    Using the Object and Procedure list together, can make you easy to located and edit the code you want in your VB application. The image above (on the top of posting)illustrates the Code Editor Window.

    To open the Visual Basic Code Editor Window you can follow the following steps:
  • In the Project Explorer window, click the form which code you want to open
  • Then Click View Code button
    How to open VB Code Editor Window

    Tips:
    For example: You have a control called txtAmount on your form. You want to write code statements on Sub txtAmount_LostFocus(). How can you do that?
    Ok, you can follow the tips below:
  • Click the Form in the Project Explorer window
  • Click View Code button

  • In the Code Editor window, click txtAmount from the Object list
    VB Code Editor Window

  • Then click LostFocus from the Procedure list
    VB Code Editor Window

    So, Sub txtAmount_LostFocus() appears on your screen (in the Code Editor window) and you can write your code statements you want.
    VB Code Editor Window


  • Tuesday, August 18, 2009

    Select Case End Select - VB6 Sample Programme Part 2

    This posting is continuation of previous posting "Select Case End Select - VB6 Sample Programme Part 1". In the previous posting you have designed a programme interface like below image, and you have saved it.
    Select Case End Select VB6 Sample Program

    Now, let's writing the programme coding for the above programme design.

  • Double click cmdCalBonus button to create sub cmdCalBonus_Click()
  • Write down below programme coding in the cmdCalBonus_Click() area

    Select Case Val(txtSalQty.Text) Case 1 To 2 txtBonus.Text = "2%" Case 3, 4 txtBonus.Text = "3%" Case 5 To 6 txtBonus.Text = "4.5%" Case 7 To 8 txtBonus.Text = "6.5%" Case 9 txtBonus.Text = "10%" Case Else txtBonus.Text = "15%" End Select txtBonusAmt.Text = Val(txtSalQty.Text) * Val(txtPriceUnit.Text) * _ Val(Left(txtBonus.Text, Len(txtBonus.Text) _ - 1)) / 100

    At the end, your programme will look like below listing:

    Private Sub cmdCalBonus_Click() Select Case Val(txtSalQty.Text) Case 1 To 2 txtBonus.Text = "2%" Case 3, 4 txtBonus.Text = "3%" Case 5 To 6 txtBonus.Text = "4.5%" Case 7 To 8 txtBonus.Text = "6.5%" Case 9 txtBonus.Text = "10%" Case Else txtBonus.Text = "15%" End Select txtBonusAmt.Text = Val(txtSalQty.Text) * Val(txtPriceUnit.Text) * _ Val(Left(txtBonus.Text, Len(txtBonus.Text) _ - 1)) / 100 End Sub

    Let's test your programme to check whether it's correct or not.
  • Click Start button on your VB toolbar
  • Type a number (for example 5) on your textbox with label Your Sales Quantity
  • Type a number (for example 100) on your textbox with label Price Unit (USD)
  • And finally click Calculate Bonus button
  • Notice what happen on your program, what's the result?

    According to the Bonus Table if Sales Quantity = 5, so the Bonus Percentage should equal to 4.5%. So the Bonus Amount = 5 X 100 X 4.5 / 100. And the result is 22.5. So your program should like below screenshot.
    Select Case End Select VB6 Sample Program

    Now I'll explain how the programme works.
  • When you type 5 in the Your Purchase Quantity, then type 100 in the Price Unit (USD), and click Calculate Bonus button, so the cmdCalBonus_Click() executed.
  • Then this statement "Val(txtSalQty.Text)" will convert text "5" into number 5
  • Then in Select Case.. defined that txtBonus.Text is "4.5%" according to the Sales Quantity => 5
  • Then program executes below statement:
    txtBonusAmt.Text = Val(txtSalQty.Text) * Val(txtPriceUnit.Text) * _
    Val(Left(txtBonus.Text, Len(txtBonus.Text) _
    - 1)) / 100
    Mybe you think that this is a complex statement. But in fact it's just a simple statement.
    Val(txtSalQty.Text) convert text "5" into number 5
    Val(txtPriceUnit.Text) convert text "100" into number 100


    Because txtBonus.Text = "4.5%" (this is a text) so:
    Len(txtBonus.Text) will return 4, and Len(txtBonus.Text) - 1 will return 3
    Left(txtBonus.Text, Len(txtBonus.Text) - 1) equals to Left("4.5%",4-1) will return "4.5"
    Then Val(Left(txtBonus.Text, Len(txtBonus.Text) - 1)) equal to Val("4.5") will return number 4.5


    So the above formula will equal to:
    txtBonusAmt.Text = Val("5")*Val("100")*Val(Left("4.5%",Len("4.5%")-1))/100
    <=> txtBonusAmt.Text = 5 * 100 * 4.5 / 100
    <=> txtBonusAmt.Text = 22.5


  • Select Case End Select - VB6 Sample Programme Part 1

    VB Select Case Sample Program
    In this posting I'll write a sample of simple VB6 programme that using Select Case..End Select control structure. However this programme also using several VB6 functions like Val() (to convert text into number so can be calculated), Len() (to get the length of a text) and Left() (to pick up a part from the left side of a text).

    The scenario of the programme is as the following:
  • This programme is Bonus Calculation (Sales System).
  • Here it is the bonus percentage table:
    Sales Quantity = 1 - 2 -> Bonus = 2%
    Sales Quantity = 3 - 4 -> Bonus = 3%
    Sales Quantity = 5 - 6 -> Bonus = 4.5%
    Sales Quantity = 7 - 8 -> Bonus = 6.5%
    Sales Quantity = 9     -> Bonus = 10%
    Sales Quantity = 10 or more -> Bonus = 15%
  • Bonus Amount = Sales Quantity X Price Unit X Bonus

    The screen design of the programme is like below screenshot.
    Secect Case End Select VB6 Sample Program

    Now, let's design the programme first (create screen interface).
  • Open your Visual Basic 6 software
  • Select a standard type project
  • Create 5 Labels
  • Create 4 Textboxes
  • Create a Command button
  • Arrange the controls on your Form like the picture above
  • Click first Label (Label1)
  • Rename the caption of Label1 into Bonus calculation
  • Change the font size into 24
  • Change the caption of Label2, Label3, Label4 and Label5 into Your Sales Quantity, Price Unit (USD), Percentage of Bonus, and Amount of Bonus (USD)

  • Click first Textbox (Text1), clear it's Text, and rename into txtSalQty
  • Click second Textbox (Text2), clear it's Text, and rename into txtPriceUnit
  • Click third Textbox (Text3), clear it's Text, and rename into txtBonus
  • Click fourth Textbox (Text4), clear it's Text, and rename into txtBonusAmt
  • Click Command1 button, change the caption into Calculate Bonus, and rename into cmdCalBonus

  • Click anywhere in Form1 area, and rename into frmCalBonus (look at properties window)
  • Click Project1 file (in Project explorer window)
  • Click cell next to (Name) in Properties Window, and change the Name into prjCalBonus

    Look at image above, your screen design should like that.
    Ok, now the time to save your work (your programme) in order you can edit it next time (this programme will be used in the next posting). Here it is tips to save your VB6 programme:
  • Click File menu on your menu bar
  • Click Save Project As... menu
  • On Save File As window, type frmCalBonus on the cell with label File name:
  • Select the folder you want to save in, then click Save button
  • Then on Save Project As window, Type prjBonus on the cell with label File name:
  • Then click Save button

    Note: The extention .vbp and .frm will automatically given by the system.
    Ok, now your programme has been saved. You have 2 files in your project: prjBonus.vbp and frmCalBonus.frm and you can close your VB programme. I'll continue to write the programme coding in the next posting.
  •