Showing posts with label VB6 Programming Tips. Show all posts

Tuesday, April 13, 2010

8 Basic Steps to Create a Program in Visual Basic


8 Basic Steps to create a program in Visual Basic

Visual Basic is one of even-driven programming. Creating an even-driven programs like Visual Basic requires different approach from that used in procedural languages. The approach may seem unusual, if you are experienced with procedural programming.

Here are 8 basic steps in creating an application with Visual Basic:

1. Create a Design Plan

2. Create the user interface

3. Set the properties of interface objects

4. Write code for events

5. Save the project

6. Test and debug the application

7. Make an executable file (by compiling it)

8. Create a setup application

Friday, April 9, 2010

How to Name Objects in VB6 Programming ?


When an object is created, a default name based on its object typed will be given to the object. For example Form1 will be given to object/control with type Form, Text2, Text3,... will be given to Textbox object, Command1, Command2,.... will be given to command button object. You should immediately change the name property of the object to a name that describes the purpose of the control. Changing the Name property of your object with a name that describe the purpose with the object will make the code in your application easier to read and debug.

Visual Basic has several Standard Naming Convensions. Although you can assign any name you want to an object, but it is a better to adopt a naming convension and use it ocnsistently throughout your programms. Because it will make easier for others to understand your code.

Here it is a list of Standard Naming Convensions used in Visual Basic that assign to each type object:
  • Object type: Check box
    The prefix you should use: chk
    Example name: chkDrink

  • Object type: Combo box
    The prefix you should use: cbo
    Example name: cboStore

  • Object type: Command button
    The prefix you should use: cmd
    Example name: cmdSelect

  • Object type: Data
    The prefix you should use: dat
    Example name: datSales

  • Object type: Directory list box
    The prefix you should use: dir
    Example name: dirImage

  • Object type: Drive list box
    The prefix you should use: drv
    Example name: drvSource

  • Object type: File list box
    The prefix you should use: fil
    Example name: filSource

  • Object type: Form
    The prefix you should use: frm
    Example name: frmEntry

  • Object type: Frame
    The prefix you should use: fra
    Example name: fraOption

  • Object type: Grid
    The prefix you should use: grd
    Example name: grdItem

  • Object type: Horizontal croll bar
    The prefix you should use: hsb
    Example name: hsbTemperature

  • Object type: Image
    The prefix you should use: img
    Example name: imgEmployee

  • Object type: Label
    The prefix you should use: lbl
    Example name: lblName

  • Object type: Line
    The prefix you should use: lin
    Example name: linHorizontal

  • Object type: List box
    The prefix you should use: lst
    Example name: lstCustomer

  • Object type: Menu
    The prefix you should use: mnu
    Example name: mnuReport

  • Object type: OLE
    The prefix you should use: ole
    Example name: oleObject2

  • Object type: Option button
    The prefix you should use: opt
    Example name: optCountry

  • Object type: Picture box
    The prefix you should use: pic
    Example name: picFlower

  • Object type: Shape
    The prefix you should use: shp
    Example name: shpSquare

  • Object type: Text box
    The prefix you should use: txt
    Example name: txtName

  • Object type: Timer
    The prefix you should use: tmr
    Example name: tmrStep

  • Object type: Vertical scroll bar
    The prefix you should use: vsb
    Example name: vsbRate


  • Saturday, April 3, 2010

    How to Return Property Values in VB6 Programming?


    It is often needed to return property value of an object to perform a calculation or some other task in your Visual Basic Application. And in the most previous sample program I've written use this way to perform some calculations, and also some other tasks. For example in the sample program of How to Convert Degree from Celcius to Another in VB 6 Programming? also returning property value to be calculated, and then the result of calculation to set the property value of other object.

    To return the value of an object property, you can use below syntax:
    Variable = Object.Property
    Or
    Object2.Property = Object1.Property

    Note:
    You can use the first syntax if you want to return the value of an object property into a variable, so the value will be kept in the variable.

    You should use the second syntax if you want to return the value to set another object property value.

    In the most sample program I've written in the previous postings use the second syntax to return value of an object property and perform the calculation, then the result kept as value of another object property.

    Notice below sample code:
    Text2.Text = Val(Text1.Text) * 1.8 + 32

    The value of Text1.Text is returned and used as an operand in the calcuation phrase and the result of calculation then used as value of Text2.Text. In this example you don't need a variable to keep the calculation result.

    Another example code:
    strName = txtName.Text
    lblName.Caption = txtName.Text

    Any comment? Please leave it in the below comment box.

    Tuesday, March 30, 2010

    Setting Object Properties at Run Time in VB6 Programming


    In the previous posting you have learnt how to set object properties at design time, by clicking the object you want, then change/set the value of property in the properties window. In this posting I'll write how to set/change property value at run time (when program running). And also I'll give you a sample program (code).

    Below is the syntax how to set an object property at run time:
    Object.Property = Expression

    For example:
    Below statement will set Caption of lblName with "John Smith" at run time.
    lblName.Caption = "John Smith"

    However not all object properties can be set their values at run time, because some object properties can be set just at design time. In the next posting maybe I'll write lists of which object properties that can be set just at design time, which ones that can be set just at run time, and which ones that can be set both at design time and run time.


    Monday, March 29, 2010

    Setting Object Properties at Design Time in VB6


    Setting Properties of Object in VB6 programming

    In the previous posting I've written that you can set the properties of an object at design time. The properties settings that you establish at design time are used as the initial settings each time your application runs. You can set the object properties by using Properties window.

    Although it is not a must, because you set the properties of course according to your need. But some properties usually you set them at design time, such as:
    BackStyle
    BorderStyle
    Caption
    Enabled
    FillColor
    FillStyle
    Name
    Visible

    How to set the value of property at design time, you can follow below steps:
  • At the Form Designer window, select the form or control which you want to set the property by clicking it.
    Visual Basic will activate the form or control, and displays the property for the object.
  • In the Propertis window, select the property you want to set.
  • Type or select the property setting value you want.
    Some property values can be selected from the list, but others must be typed.


  • Sunday, March 28, 2010

    A Tips to Create a Function to Convert Numbers into Roman Numerals


    To create a number of letters we often use roman numerals to indicate the month of making the letter.For example, the letter number is '001 / Int/III/2010' where the symbol 'III' indicates that the letter was made in March 2010.

    For this we need a function that can convert an integer number from 1 to 12 into roman numerals. In the Visual Basic programming, we can easily create such a function. Well, here we'll show an example program to create such functions, as well as examples of how to use it.

  • First open your VB program and select standard exe form


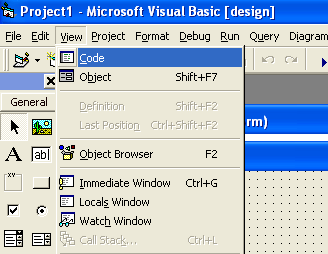
  • Click the View menu


  • Click the Code menu


  • Write the Visual Basic (VB) program code below
    Function IToR(i As Integer) As String Dim s As String s = "I II III IV V VI VII VIIIIX X XI XII " IToR = Mid(s, (i - 1) * 4 + 1, 4) End Function


  • Click the View menu


  • Click the Object menu


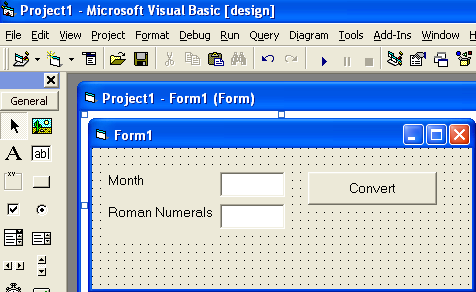
  • Put two label controls, two textboxes and a CommandButton to the form


  • Change the Caption of first label into 'Month'


  • Change the Caption of second label into 'Roman Numeral'


  • Change the name of the first textbox into 'txtMonth'


  • Change the name of the second textbox into 'txtRomNum'


  • Remove texts on the first and second textboxes


  • Change the name of the CommandButton into 'cmdConvert'


  • Change the CommandButton caption into 'Convert'
    So your Screen design will look like the image below:


  • Double click CommandButton 'Convert'


  • Write below Visual Basic (VB) program coding
    Private Sub cmdConvert_Click() txtRomNum.Text = IToR(Val(txtMonth.Text)) End Sub

    Okay, you have completed the program
    Now it's time to test


    • Run your program
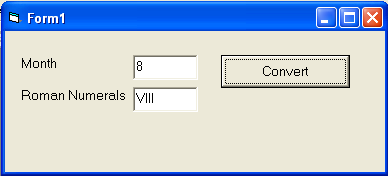
  • Type a number such as 8 in the first textbox


  • Click CommandButton 'Convert'
    Consider the results


  • Thursday, August 20, 2009

    With...End With Statement to Set Object Properties in VB6


    How to Set Object Properties using With..End With
    In the earlier posting I have written that you can set object properties in two session, at design-time and at run-time, although some object properties can be set in both run-time and design-time, other can be set just in design-time, and onother can be set just in run time.

    When you set object properties maybe you need to several properties at once, for example you want to set the properties of TextBox as following:
  • set font to Bold mode
  • set Font Size to 24
  • set the text with a value "Set Object Properties"

    So you can do with the following coding:
    Text1.Font.Bold = True
    Text1.Font.Size = 24
    Text1.Text = "Set Object Properties"

    However to make it easier to read, and easier to understand, you can use With..End With statement to set several Object Properies.
    You can use below code statement:
    With Text1
    .Font.Bold = True
    .Font.Size = 24
    .Text = "Set Object Properties"
    End With

    Example:
    Create a screen design like below image:
    How to Set Object Properties using With..End With
    Note: Set property "Multiline" of Text1 and Text2 to "True".

    Double-click command1 button.
    Write below coding:
    Text1.Text = "One by one set object properties"
    Text1.Font.Bold = True
    Text1.Font.Size = 24
    Text1.FontUnderline = True

    Double-click command2 button.
    Write below code statements:
    With Text2
    .Text = "Using With..End With to set object properties"
    .Font.Bold = True
    .Font.Size = 24
    .FontUnderline = True
    End With

    So your coding should like below listing:
    Private Sub Command1_Click()
    Text1.Text = "One by one set object properties"
    Text1.Font.Bold = True
    Text1.Font.Size = 24
    Text1.FontUnderline = True
    End Sub
    Private Sub Command2_Click()
    With Text2
    .Text = "Using With..End With to set object properties"
    .Font.Bold = True
    .Font.Size = 24
    .FontUnderline = True
    End With
    End Sub

    Now run your program, click command1 button, and then also click command2 button.
    Your program sholud like screenshot in the top of this posting.


  • Wednesday, August 19, 2009

    How to Place Controls into Form in VB6 Programming?

    Visual Basic Toolbox and Form
    In the previous posting I've told you that one of Visual Basic Development Environment's element is Toolbox, that contains controls. And another element is Form Design window (Form). You can place controls into your Form to build your VB application.

    Now, how to place controls from Toolbox into your Form? Ok, it's just a simple way to do that. You just click, drag and drop the control you want. Or also you can double-click the icon Toolbox of the control you want.

    There are two manners to place (add) controls to a form. The first manner is double-click the Toolbox icon of the control you want to add. In instance it will place the control with default size in the centre of active form.
    Control placed in the center active form

    When you adding more than one controls with this way, they will be placed on the top of each other in the center of the form. Then you can reposition/rearrange them into new place you want in the form.

    The second manner, you can follow below steps:
  • First, click on the Toolbox icon of the control you want (for example TextBox control)
    How to add control to form - Click icon you want

  • Place your mouse pointer on the Form (the pointer change to crosshair / + sign)
  • Position the pointer in the place where you want the upper left corner of the control
  • Click your mouse, hold, and drag (so your pointer draws a rectangle that indicate the size of your control)

    How to add control to form - Drag your mouse

  • When your control is correctly sized, release your mouse, so the control now appears on your Form
    How to add control to form - Release your mouse

    After you add controls to your form, you can reposition them to new location in the form, and also you can resize them according to your need. That are the way how to add / place control to your Visual Basic form.

    Ok, I think you get it. And I'll write another Visual Basic tips in the next posting.


  • Visual Basic Code Editor Window

    Visual Basic Code Editor Window
    In the earlier posting I've told you that a VB Project maybe contains one or more files like form, module, and so on. One form usually contains one or more controls. However a form with it's control contained on it can't do anything without code statements (programming code) that associate with them. And a module also contains one or more statements.

    A place in VB Development Environment where you can write your VB code statements (programming code) is called Visual Basic Code Editor Window. It's also known as the Code Window. A sparate Code Editor Window is displayed for each form or module in your project, making it easy to organize, view, and navigate.

    There are two drop-down lists at the top of the Code Editor Window called Object List and Procedure List.The Object list contains a list of all the Contols that exist on the form. When you selectiong a control name from the list, the Procedure list shows all the events (actions) for the control.

    Using the Object and Procedure list together, can make you easy to located and edit the code you want in your VB application. The image above (on the top of posting)illustrates the Code Editor Window.

    To open the Visual Basic Code Editor Window you can follow the following steps:
  • In the Project Explorer window, click the form which code you want to open
  • Then Click View Code button
    How to open VB Code Editor Window

    Tips:
    For example: You have a control called txtAmount on your form. You want to write code statements on Sub txtAmount_LostFocus(). How can you do that?
    Ok, you can follow the tips below:
  • Click the Form in the Project Explorer window
  • Click View Code button

  • In the Code Editor window, click txtAmount from the Object list
    VB Code Editor Window

  • Then click LostFocus from the Procedure list
    VB Code Editor Window

    So, Sub txtAmount_LostFocus() appears on your screen (in the Code Editor window) and you can write your code statements you want.
    VB Code Editor Window


  • Sunday, August 16, 2009

    How to Automate Convert Numbers into Letters in VB6 Programming?

    How to automate conversion numbers? In the previous posting you have learnt how to convert numbers into letters with Select Case..End Select control structure, If..Then..Else..End If control structure, and command button. The conversion will be processed after you clik command button. In this session you still learn how to convert number into letter with Select Case..End Select and If..Then..Else..End If, however you don't need a command button anymore. The conversion will automatically processed when you typing a number in the text box. How to do this? What's the program like?

    This is just an easy thing to do. You can use the previous program conversion number you have created. You just write down your coding in Sub Text1_Change() and Sub Text2_Change(). This two Subs that make conversion process automatically done. For detail how to do, you can follow below instructions (it's a simple VB programming tips).

    1. Using if..then..else..end if control structure
  • Create a VB project for example Project1
  • Create a VB standard form for example Form1
  • Create a text box for example Text1
  • Create another text box for example Text2
  • Create a label for example Label1
  • Create another label for example Label2
  • Doubleclick Text1 text box to create a Sub Text1_Change()
  • Write down below program coding in the Sub Text1_Change() area

    If Val(Text1.Text) = 0 Then Label1.Caption = "zero" Else If Val(Text1.Text) = 1 Then Label1.Caption = "one" Else If Val(Text1.Text) = 2 Then Label1.Caption = "two" Else If Val(Text1.Text) = 3 Then Label1.Caption = "three" Else If Val(Text1.Text) = 4 Then Label1.Caption = "four" Else If Val(Text1.Text) = 5 Then Label1.Caption = "five" Else If Val(Text1.Text) = 6 Then Label1.Caption = "six" Else If Val(Text1.Text) = 7 Then Label1.Caption = "seven" Else If Val(Text1.Text) = 8 Then Label1.Caption = "eight" Else If Val(Text1.Text) = 9 Then Label1.Caption = "nine" Else If Val(Text1.Text) = 10 Then Label1.Caption = "ten" Else If Val(Text1.Text) = 11 Then Label1.Caption = "eleven" Else If Val(Text1.Text) = 12 Then Label1.Caption = "twelve" Else If Val(Text1.Text) = 13 Then Label1.Caption = "thirteen" Else If Val(Text1.Text) = 14 Then Label1.Caption = "forteen" Else If Val(Text1.Text) = 15 Then Label1.Caption = "fifteen" Else If Val(Text1.Text) = 16 Then Label1.Caption = "sixteen" Else If Val(Text1.Text) = 17 Then Label1.Caption = "seventeen" Else If Val(Text1.Text) = 18 Then Label1.Caption = "eighteen" Else If Val(Text1.Text) = 19 Then Label1.Caption = "nineteen" Else If Val(Text1.Text) = 20 Then Label1.Caption = "twenty" Else Label1.Caption = "unrecognize number" End If End If End If End If End If End If End If End If End If End If End If End If End If End If End If End If End If End If End If End If End If


  • 2. Using Select Case..End Select control structure

  • Doubleclick Text2 text box to create a Sub Text2_Change()
  • Write down below program coding in the Sub Text2_Change() area

    Select Case Val(Text2.Text) Case 0 Label2.Caption = "zero" Case 1 Label2.Caption = "one" Case 2 Label2.Caption = "two" Case 3 Label2.Caption = "three" Case 4 Label2.Caption = "four" Case 5 Label2.Caption = "five" Case 6 Label2.Caption = "six" Case 7 Label2.Caption = "seven" Case 8 Label2.Caption = "eight" Case 9 Label2.Caption = "nine" Case 10 Label2.Caption = "ten" Case 11 Label2.Caption = "eleven" Case 12 Label2.Caption = "twelve" Case 13 Label2.Caption = "thirteen" Case 14 Label2.Caption = "forteen" Case 15 Label2.Caption = "fifteen" Case 16 Label2.Caption = "sixteen" Case 17 Label2.Caption = "seventeen" Case 18 Label2.Caption = "eighteen" Case 19 Label2.Caption = "nineteen" Case 20 Label2.Caption = "twenty" Case Else Label2.Caption = "unrecognize number" End Select


  • You can run your program by clicking Start button on your VB toolbar to check whether your program is correct or not.

  • Type a number in Text1 box for example 15


  • Type a number in Text2 box for example 15

    If letter "fifteen" appears in both Label1 and Label2, it means that your program is correct, and running properly.


  •