Thursday, August 20, 2009

With...End With Statement to Set Object Properties in VB6


How to Set Object Properties using With..End With
In the earlier posting I have written that you can set object properties in two session, at design-time and at run-time, although some object properties can be set in both run-time and design-time, other can be set just in design-time, and onother can be set just in run time.

When you set object properties maybe you need to several properties at once, for example you want to set the properties of TextBox as following:
  • set font to Bold mode
  • set Font Size to 24
  • set the text with a value "Set Object Properties"

    So you can do with the following coding:
    Text1.Font.Bold = True
    Text1.Font.Size = 24
    Text1.Text = "Set Object Properties"

    However to make it easier to read, and easier to understand, you can use With..End With statement to set several Object Properies.
    You can use below code statement:
    With Text1
    .Font.Bold = True
    .Font.Size = 24
    .Text = "Set Object Properties"
    End With

    Example:
    Create a screen design like below image:
    How to Set Object Properties using With..End With
    Note: Set property "Multiline" of Text1 and Text2 to "True".

    Double-click command1 button.
    Write below coding:
    Text1.Text = "One by one set object properties"
    Text1.Font.Bold = True
    Text1.Font.Size = 24
    Text1.FontUnderline = True

    Double-click command2 button.
    Write below code statements:
    With Text2
    .Text = "Using With..End With to set object properties"
    .Font.Bold = True
    .Font.Size = 24
    .FontUnderline = True
    End With

    So your coding should like below listing:
    Private Sub Command1_Click()
    Text1.Text = "One by one set object properties"
    Text1.Font.Bold = True
    Text1.Font.Size = 24
    Text1.FontUnderline = True
    End Sub
    Private Sub Command2_Click()
    With Text2
    .Text = "Using With..End With to set object properties"
    .Font.Bold = True
    .Font.Size = 24
    .FontUnderline = True
    End With
    End Sub

    Now run your program, click command1 button, and then also click command2 button.
    Your program sholud like screenshot in the top of this posting.

  • Wednesday, August 19, 2009

    How to Place Controls into Form in VB6 Programming?

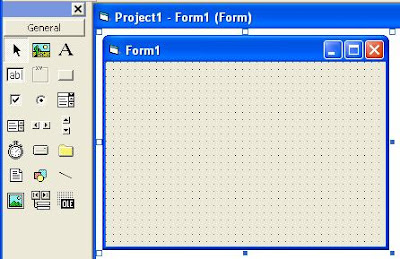
    Visual Basic Toolbox and Form
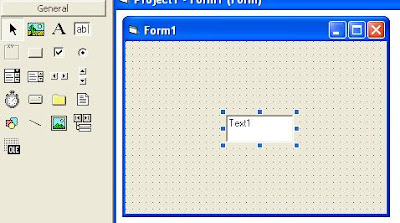
    In the previous posting I've told you that one of Visual Basic Development Environment's element is Toolbox, that contains controls. And another element is Form Design window (Form). You can place controls into your Form to build your VB application.

    Now, how to place controls from Toolbox into your Form? Ok, it's just a simple way to do that. You just click, drag and drop the control you want. Or also you can double-click the icon Toolbox of the control you want.

    There are two manners to place (add) controls to a form. The first manner is double-click the Toolbox icon of the control you want to add. In instance it will place the control with default size in the centre of active form.
    Control placed in the center active form

    When you adding more than one controls with this way, they will be placed on the top of each other in the center of the form. Then you can reposition/rearrange them into new place you want in the form.

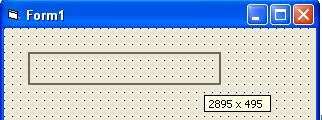
    The second manner, you can follow below steps:
  • First, click on the Toolbox icon of the control you want (for example TextBox control)
    How to add control to form - Click icon you want

  • Place your mouse pointer on the Form (the pointer change to crosshair / + sign)
  • Position the pointer in the place where you want the upper left corner of the control
  • Click your mouse, hold, and drag (so your pointer draws a rectangle that indicate the size of your control)

    How to add control to form - Drag your mouse

  • When your control is correctly sized, release your mouse, so the control now appears on your Form
    How to add control to form - Release your mouse

    After you add controls to your form, you can reposition them to new location in the form, and also you can resize them according to your need. That are the way how to add / place control to your Visual Basic form.

    Ok, I think you get it. And I'll write another Visual Basic tips in the next posting.


  • Visual Basic Code Editor Window

    Visual Basic Code Editor Window
    In the earlier posting I've told you that a VB Project maybe contains one or more files like form, module, and so on. One form usually contains one or more controls. However a form with it's control contained on it can't do anything without code statements (programming code) that associate with them. And a module also contains one or more statements.

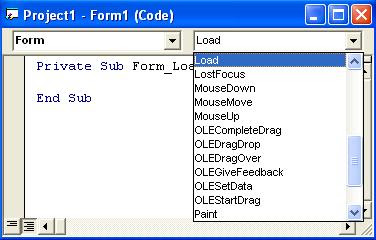
    A place in VB Development Environment where you can write your VB code statements (programming code) is called Visual Basic Code Editor Window. It's also known as the Code Window. A sparate Code Editor Window is displayed for each form or module in your project, making it easy to organize, view, and navigate.

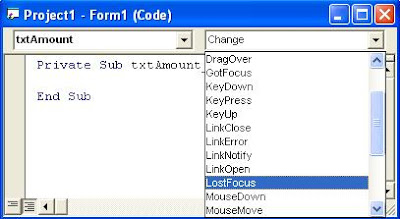
    There are two drop-down lists at the top of the Code Editor Window called Object List and Procedure List.The Object list contains a list of all the Contols that exist on the form. When you selectiong a control name from the list, the Procedure list shows all the events (actions) for the control.

    Using the Object and Procedure list together, can make you easy to located and edit the code you want in your VB application. The image above (on the top of posting)illustrates the Code Editor Window.

    To open the Visual Basic Code Editor Window you can follow the following steps:
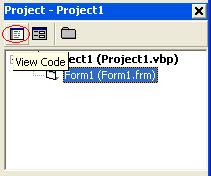
  • In the Project Explorer window, click the form which code you want to open
  • Then Click View Code button
    How to open VB Code Editor Window

    Tips:
    For example: You have a control called txtAmount on your form. You want to write code statements on Sub txtAmount_LostFocus(). How can you do that?
    Ok, you can follow the tips below:
  • Click the Form in the Project Explorer window
  • Click View Code button

  • In the Code Editor window, click txtAmount from the Object list
    VB Code Editor Window

  • Then click LostFocus from the Procedure list
    VB Code Editor Window

    So, Sub txtAmount_LostFocus() appears on your screen (in the Code Editor window) and you can write your code statements you want.
    VB Code Editor Window


  • Tuesday, August 18, 2009

    Select Case End Select - VB6 Sample Programme Part 2

    This posting is continuation of previous posting "Select Case End Select - VB6 Sample Programme Part 1". In the previous posting you have designed a programme interface like below image, and you have saved it.
    Select Case End Select VB6 Sample Program

    Now, let's writing the programme coding for the above programme design.

  • Double click cmdCalBonus button to create sub cmdCalBonus_Click()
  • Write down below programme coding in the cmdCalBonus_Click() area

    Select Case Val(txtSalQty.Text) Case 1 To 2 txtBonus.Text = "2%" Case 3, 4 txtBonus.Text = "3%" Case 5 To 6 txtBonus.Text = "4.5%" Case 7 To 8 txtBonus.Text = "6.5%" Case 9 txtBonus.Text = "10%" Case Else txtBonus.Text = "15%" End Select txtBonusAmt.Text = Val(txtSalQty.Text) * Val(txtPriceUnit.Text) * _ Val(Left(txtBonus.Text, Len(txtBonus.Text) _ - 1)) / 100

    At the end, your programme will look like below listing:

    Private Sub cmdCalBonus_Click() Select Case Val(txtSalQty.Text) Case 1 To 2 txtBonus.Text = "2%" Case 3, 4 txtBonus.Text = "3%" Case 5 To 6 txtBonus.Text = "4.5%" Case 7 To 8 txtBonus.Text = "6.5%" Case 9 txtBonus.Text = "10%" Case Else txtBonus.Text = "15%" End Select txtBonusAmt.Text = Val(txtSalQty.Text) * Val(txtPriceUnit.Text) * _ Val(Left(txtBonus.Text, Len(txtBonus.Text) _ - 1)) / 100 End Sub

    Let's test your programme to check whether it's correct or not.
  • Click Start button on your VB toolbar
  • Type a number (for example 5) on your textbox with label Your Sales Quantity
  • Type a number (for example 100) on your textbox with label Price Unit (USD)
  • And finally click Calculate Bonus button
  • Notice what happen on your program, what's the result?

    According to the Bonus Table if Sales Quantity = 5, so the Bonus Percentage should equal to 4.5%. So the Bonus Amount = 5 X 100 X 4.5 / 100. And the result is 22.5. So your program should like below screenshot.
    Select Case End Select VB6 Sample Program

    Now I'll explain how the programme works.
  • When you type 5 in the Your Purchase Quantity, then type 100 in the Price Unit (USD), and click Calculate Bonus button, so the cmdCalBonus_Click() executed.
  • Then this statement "Val(txtSalQty.Text)" will convert text "5" into number 5
  • Then in Select Case.. defined that txtBonus.Text is "4.5%" according to the Sales Quantity => 5
  • Then program executes below statement:
    txtBonusAmt.Text = Val(txtSalQty.Text) * Val(txtPriceUnit.Text) * _
    Val(Left(txtBonus.Text, Len(txtBonus.Text) _
    - 1)) / 100
    Mybe you think that this is a complex statement. But in fact it's just a simple statement.
    Val(txtSalQty.Text) convert text "5" into number 5
    Val(txtPriceUnit.Text) convert text "100" into number 100


    Because txtBonus.Text = "4.5%" (this is a text) so:
    Len(txtBonus.Text) will return 4, and Len(txtBonus.Text) - 1 will return 3
    Left(txtBonus.Text, Len(txtBonus.Text) - 1) equals to Left("4.5%",4-1) will return "4.5"
    Then Val(Left(txtBonus.Text, Len(txtBonus.Text) - 1)) equal to Val("4.5") will return number 4.5


    So the above formula will equal to:
    txtBonusAmt.Text = Val("5")*Val("100")*Val(Left("4.5%",Len("4.5%")-1))/100
    <=> txtBonusAmt.Text = 5 * 100 * 4.5 / 100
    <=> txtBonusAmt.Text = 22.5


  • Select Case End Select - VB6 Sample Programme Part 1

    VB Select Case Sample Program
    In this posting I'll write a sample of simple VB6 programme that using Select Case..End Select control structure. However this programme also using several VB6 functions like Val() (to convert text into number so can be calculated), Len() (to get the length of a text) and Left() (to pick up a part from the left side of a text).

    The scenario of the programme is as the following:
  • This programme is Bonus Calculation (Sales System).
  • Here it is the bonus percentage table:
    Sales Quantity = 1 - 2 -> Bonus = 2%
    Sales Quantity = 3 - 4 -> Bonus = 3%
    Sales Quantity = 5 - 6 -> Bonus = 4.5%
    Sales Quantity = 7 - 8 -> Bonus = 6.5%
    Sales Quantity = 9     -> Bonus = 10%
    Sales Quantity = 10 or more -> Bonus = 15%
  • Bonus Amount = Sales Quantity X Price Unit X Bonus

    The screen design of the programme is like below screenshot.
    Secect Case End Select VB6 Sample Program

    Now, let's design the programme first (create screen interface).
  • Open your Visual Basic 6 software
  • Select a standard type project
  • Create 5 Labels
  • Create 4 Textboxes
  • Create a Command button
  • Arrange the controls on your Form like the picture above
  • Click first Label (Label1)
  • Rename the caption of Label1 into Bonus calculation
  • Change the font size into 24
  • Change the caption of Label2, Label3, Label4 and Label5 into Your Sales Quantity, Price Unit (USD), Percentage of Bonus, and Amount of Bonus (USD)

  • Click first Textbox (Text1), clear it's Text, and rename into txtSalQty
  • Click second Textbox (Text2), clear it's Text, and rename into txtPriceUnit
  • Click third Textbox (Text3), clear it's Text, and rename into txtBonus
  • Click fourth Textbox (Text4), clear it's Text, and rename into txtBonusAmt
  • Click Command1 button, change the caption into Calculate Bonus, and rename into cmdCalBonus

  • Click anywhere in Form1 area, and rename into frmCalBonus (look at properties window)
  • Click Project1 file (in Project explorer window)
  • Click cell next to (Name) in Properties Window, and change the Name into prjCalBonus

    Look at image above, your screen design should like that.
    Ok, now the time to save your work (your programme) in order you can edit it next time (this programme will be used in the next posting). Here it is tips to save your VB6 programme:
  • Click File menu on your menu bar
  • Click Save Project As... menu
  • On Save File As window, type frmCalBonus on the cell with label File name:
  • Select the folder you want to save in, then click Save button
  • Then on Save Project As window, Type prjBonus on the cell with label File name:
  • Then click Save button

    Note: The extention .vbp and .frm will automatically given by the system.
    Ok, now your programme has been saved. You have 2 files in your project: prjBonus.vbp and frmCalBonus.frm and you can close your VB programme. I'll continue to write the programme coding in the next posting.


  • Sunday, August 16, 2009

    Temperature Conversion with Multiple Base in VB6 Programming

    Temeprature Conversion with Multiple Base in VB6 Programming


    How to Convert Degree from Kelvin to Another in VB6 Programming?

    How to Convert Degree from Kelvin to Another?


    How to Convert Degree from Rheamur to Another in VB6 Programming?

    In the previous posting you have learnt a simple VB programming tips "How to convert degree from Fahrenheit into another one in VB6 programming". Now we will learn another simple VB programming tips "How to convert degree / temperature from Rheamur into another one", so the base degree is Rheamur, and will be converted into Celcius, Fahrenheit and Kelvin. We have three previous conversion formulas (Celcius base) as follow:
    Fahrenheit = ( Celcius X 1.8 ) + 32
    Rheamur = Celcius X 0.8
    Kelvin = Celcius + 273.15


    From these formulas, now we can generate new three other formulas (Rheamur base) as the following:
    Celcius = Rheamur / 0.8
    Fahrenheit = ( ( Rheamur / 0.8 ) X 1.8 ) + 32
    Kelvin = ( Rheamur / 0.8 ) + 273.15


    Now, let's implement above formulas into a simple VB6 programming. Let's go on to the following simple VB programming tips!

  • Create a VB project for example Project1
  • Create a VB standard form for example Form1
  • Create 5 labels for example Label1, Label2, Label3, Label4, Label5
  • Go to Label1 properties by clicking Label1 object, and then change Label1 Caption into "Degree Conversion", and change Font Size into 14.
  • Go to Label2 properties, and then change Label2 Caption into "Rheamur"
  • Go to Label3 properties, and then change Label3 Caption into "Celcius"
  • Go to Label4 properties, and then change Label4 Caption into "Fahrenheit"
  • Go to Label5 properties, and then change Label5 Caption into "Kelvin"
  • Create 4 text boxes for example Text1, Text2, Text3, Text4
  • Create a command button for example Command1
  • Go to Command1 properties, and change Command1 caption into "Convert"

    So your screen design should look like below image:
    Screen Design Simple VB6 Program - Degree Conversion from Rheamur

  • Double click anywhere in the Form1 area to create a Sub Form_Load()
  • Write down below program coding in the Sub Form_Load() area
    'to clear the content of text boxes
    Text1.Text = ""
    Text2.Text = ""
    Text3.Text = ""
    Text4.Text = ""

  • Double click the command button with caption "Convert" to create a Sub Command1_Click()
  • Write down below program coding in the Sub Command1_Click() area
    'conversion process
    'Text1 represents Rheamur
    'Text2 represents Celcius
    'Text3 represents Fahrenheit
    'Text4 represents Kelvin
    Text2.Text = Val(Text1.Text) / 0.8
    Text3.Text = ((Val(Text1.Text) / 0.8) * 1.8) + 32
    Text4.Text = (Val(Text1.Text) / 0.8) + 273.15

    So your program will look like below listing:
    Private Sub Command1_Click()
    'conversion process
    'Text1 represents Rheamur
    'Text2 represents Celcius
    'Text3 represents Fahrenheit
    'Text4 represents Kelvin
    Text2.Text = Val(Text1.Text) / 0.8
    Text3.Text = ((Val(Text1.Text) / 0.8) * 1.8) + 32
    Text4.Text = (Val(Text1.Text) / 0.8) + 273.15
    End Sub

    Private Sub Form_Load()
    'to clear the content of text boxes
    Text1.Text = ""
    Text2.Text = ""
    Text3.Text = ""
    Text4.Text = ""
    End Sub

    Ok, your program's finish. Test your program by clicking Start button on your VB toolbar to know whether your program working properly or not.
  • Type a number in Text1 for example 80 (in the text box with label "Rheamur")
  • Click command button with label "Convert"
    If the results are 100 in Text2 (Celcius), 212 in Text3 (Fahrenheit), and 373.15 in Text4 (Kelvin), it means that your program is correct and working properly.
    Look at below image for your illustration.
    Simple Vb Program Degree Conversion From Rheamur

    It is very easy and very simple isn't it? Would you like to try it? Ok, in the next posting I'll write another simple tips with VB6 programming. See you in the next posting!


  • How to Convert Degree from Fahrenheit to Another in VB6 Programming?

    In the previous posting I've told you a simple VB programming tips "How to convert degree from Celcius into another one". In this posting I'll tell you a tips "How to convert degree from Fahrenheit into another one", so the base degree is Fahrenheit. It will be converted into Celcius, Rheamur and Kelvin. As we know that we have three previous conversion formulas (Celcius base):
    Fahrenheit = ( Celcius X 1.8 ) + 32
    Rheamur = Celcius X 0.8
    Kelvin = Celcius + 273.15


    From above formulas, we are able to generate three other formulas (Fahrenheit base) as below:
    Celcius = ( Fahrenheit - 32 ) / 1.8
    Rheamur = ( ( Fahrenheit - 32 ) / 1.8 ) X 0.8
    Kelvin = ( ( Fahrenheit - 32 ) / 1.8 ) + 273.15


    Now let's implement these formulas in VB6 simple programming. Please follow below steps for your tips!

  • Create a VB project for example Project1
  • Create a VB standard form for example Form1
  • Create 5 labels for example Label1, Label2, Label3, Label4, Label5
  • Go to Label1 properties by clicking Label1 object, and then change Label1 Caption into "Degree Conversion", and change Font Size into 14.
  • Go to Label2 properties, and then change Label2 Caption into "Fahrenheit"
  • Go to Label3 properties, and then change Label3 Caption into "Celcius"
  • Go to Label4 properties, and then change Label4 Caption into "Rheamur"
  • Go to Label5 properties, and then change Label5 Caption into "Kelvin"
  • Create 4 text boxes for example Text1, Text2, Text3, Text4
  • Create a command button for example Command1
  • Go to Command1 properties, and change Command1 caption into "Convert"

    So your design will look like below image (just a simple Screen Design):


    Double click any where in Form1 area to create a Sub Form_Load()
    Write down below program coding in the Sub Form_Load() area

    'to clear the content of text boxes Text1.Text = "" Text2.Text = "" Text3.Text = "" Text4.Text = ""


    Double click Command1 command button (with caption "Convert") to create a Sub Command1_Click()
    Write down below program coding in the Sub Command1_Click() area

    'conversion process 'Text1 represents Fahrenheit 'Text2 represents Celcius 'Text3 represents Rheamur 'Text4 represents Kelvin Text2.Text = (Val(Text1.Text) - 32) / 1.8 Text3.Text = ((Val(Text1.Text) - 32) / 1.8) * 0.8 Text4.Text = ((Val(Text1.Text) - 32) / 1.8) + 273.15


    So your program should look like below listing:

    Private Sub Command1_Click() 'conversion process 'Text1 represents Fahrenheit 'Text2 represents Celcius 'Text3 represents Rheamur 'Text4 represents Kelvin Text2.Text = (Val(Text1.Text) - 32) / 1.8 Text3.Text = ((Val(Text1.Text) - 32) / 1.8) * 0.8 Text4.Text = ((Val(Text1.Text) - 32) / 1.8) + 273.15 End Sub


    Private Sub Form_Load() 'to clear the content of text boxes Text1.Text = "" Text2.Text = "" Text3.Text = "" Text4.Text = "" End Sub


    Note: In this simple VB program we haven't used variables yet, but we just use controls from Toolbox. Mybe in the next program we will use variables.

    Ok, your program finish. Test your program by clicking Start button on your VB toolbar to know whether your program's working properly or not.
  • Type a number in Text1 for example 212 (in the text box with label "Fahrenheit")
  • Click command button with label "Convert"
    If the results are 100 in Text2 (Celcius), 80 in Text3 (Rheamur), and 373.15 in Text4 (Kelvin), it means that your program is correct and working properly.
    Look at below image for your illustration. Your program should like it.
    A Simple VB Program Degree Conversion from Fahrenheit

    It's an easy simple VB program isn't it? Would you like to try it?


  • How to Convert Degree from Celcius to Another in VB6 Programming?

    In this posting I will tell you a simple VB programming tips "How to convert degree / temperature from Celcius to another one", so the base temperature is Celcius. The temperature will be converted into Fahrenheit, Rheamur and Kelvin. As we know that we have three conversion formulas are (in Celcius base):
    Fahrenheit = ( Celcius X 1.8 ) + 32
    Rheamur = Celcius X 0.8
    Kelvin = Celcius + 273.15
    How to apply these three formulas in simple VB6 programming? It's just an easy thing to do! You can do it just with a simple VB program. Please follow below instructions for your tips!

  • Create a VB project for example Project1
  • Create a VB standard form for example Form1
  • Create 5 labels for example Label1, Label2, Label3, Label4, Label5
  • Go to Label1 properties by clicking Label1 object, and then change Label1 Caption into "Degree Conversion", and change Font Size into 14.

  • Go to Label2 properties, and find Label2 Caption and change the value into "Celcius"
  • Go to Label3 properties, and then change Label3 Caption into "Fahrenheit"
  • Go to Label4 properties, and then change Label4 Caption into "Rheamur"
  • Go to Label5 properties, and then change Label5 Caption into "Kelvin"
  • Create 4 text boxes for example Text1, Text2, Text3, Text4
  • Create a command button for example Command1
  • Go to Command1 properties, and change Command1 caption into "Convert"

    So your screen design will look like below image:
    Design Simple VB Program Degree Conversion from Celcius
    Now, let's write the program coding.
    Double click any where in Form1 area to create a Sub Form_Load()
    Write down below program coding in the Sub Form_Load() area

    'to clear text boxes text Text1.Text = "" Text2.Text = "" Text3.Text = "" Text4.Text = ""


    Double click Command1 command button to create a Sub Command1_Click()
    Write down below program coding in the Sub Command1_Click() area

    Text2.Text = Val(Text1.Text) * 1.8 + 32 Text3.Text = Val(Text1.Text) * 0.8 Text4.Text = Val(Text1.Text) + 273.15


    So your program will look like the following list:

    Private Sub Command1_Click() Text2.Text = Val(Text1.Text) * 1.8 + 32 Text3.Text = Val(Text1.Text) * 0.8 Text4.Text = Val(Text1.Text) + 273.15 End Sub

    Private Sub Form_Load() 'to clear text boxes text Text1.Text = "" Text2.Text = "" Text3.Text = "" Text4.Text = "" End Sub


    Now, you can test your program by clicking Start button on your VB toolbar to check whether your program is correct or not.
  • Type a number in Text1 for example 15 (in the text box with label "Celcius")
  • Click Command1 command button (with label "Convert")
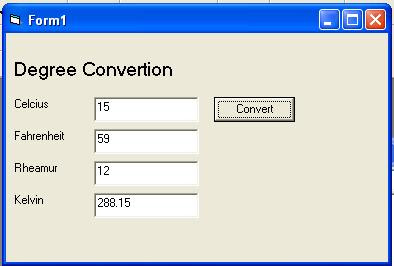
    If the results are 59 in Text2 (Fahrenheit), 12 in Text3 (Rheamur), and 288.15 in Text4 (Kelvin), it means that your program is correct and running properly.
    Look at below image for your illustration.
    Simple VB Program Degree Conversion from Celcius

    How do you think, it's an easy simple VB programming tips isn't it?


  • How to Automate Convert Numbers into Letters in VB6 Programming?

    How to automate conversion numbers? In the previous posting you have learnt how to convert numbers into letters with Select Case..End Select control structure, If..Then..Else..End If control structure, and command button. The conversion will be processed after you clik command button. In this session you still learn how to convert number into letter with Select Case..End Select and If..Then..Else..End If, however you don't need a command button anymore. The conversion will automatically processed when you typing a number in the text box. How to do this? What's the program like?

    This is just an easy thing to do. You can use the previous program conversion number you have created. You just write down your coding in Sub Text1_Change() and Sub Text2_Change(). This two Subs that make conversion process automatically done. For detail how to do, you can follow below instructions (it's a simple VB programming tips).

    1. Using if..then..else..end if control structure
  • Create a VB project for example Project1
  • Create a VB standard form for example Form1
  • Create a text box for example Text1
  • Create another text box for example Text2
  • Create a label for example Label1
  • Create another label for example Label2
  • Doubleclick Text1 text box to create a Sub Text1_Change()
  • Write down below program coding in the Sub Text1_Change() area

    If Val(Text1.Text) = 0 Then Label1.Caption = "zero" Else If Val(Text1.Text) = 1 Then Label1.Caption = "one" Else If Val(Text1.Text) = 2 Then Label1.Caption = "two" Else If Val(Text1.Text) = 3 Then Label1.Caption = "three" Else If Val(Text1.Text) = 4 Then Label1.Caption = "four" Else If Val(Text1.Text) = 5 Then Label1.Caption = "five" Else If Val(Text1.Text) = 6 Then Label1.Caption = "six" Else If Val(Text1.Text) = 7 Then Label1.Caption = "seven" Else If Val(Text1.Text) = 8 Then Label1.Caption = "eight" Else If Val(Text1.Text) = 9 Then Label1.Caption = "nine" Else If Val(Text1.Text) = 10 Then Label1.Caption = "ten" Else If Val(Text1.Text) = 11 Then Label1.Caption = "eleven" Else If Val(Text1.Text) = 12 Then Label1.Caption = "twelve" Else If Val(Text1.Text) = 13 Then Label1.Caption = "thirteen" Else If Val(Text1.Text) = 14 Then Label1.Caption = "forteen" Else If Val(Text1.Text) = 15 Then Label1.Caption = "fifteen" Else If Val(Text1.Text) = 16 Then Label1.Caption = "sixteen" Else If Val(Text1.Text) = 17 Then Label1.Caption = "seventeen" Else If Val(Text1.Text) = 18 Then Label1.Caption = "eighteen" Else If Val(Text1.Text) = 19 Then Label1.Caption = "nineteen" Else If Val(Text1.Text) = 20 Then Label1.Caption = "twenty" Else Label1.Caption = "unrecognize number" End If End If End If End If End If End If End If End If End If End If End If End If End If End If End If End If End If End If End If End If End If


  • 2. Using Select Case..End Select control structure

  • Doubleclick Text2 text box to create a Sub Text2_Change()
  • Write down below program coding in the Sub Text2_Change() area

    Select Case Val(Text2.Text) Case 0 Label2.Caption = "zero" Case 1 Label2.Caption = "one" Case 2 Label2.Caption = "two" Case 3 Label2.Caption = "three" Case 4 Label2.Caption = "four" Case 5 Label2.Caption = "five" Case 6 Label2.Caption = "six" Case 7 Label2.Caption = "seven" Case 8 Label2.Caption = "eight" Case 9 Label2.Caption = "nine" Case 10 Label2.Caption = "ten" Case 11 Label2.Caption = "eleven" Case 12 Label2.Caption = "twelve" Case 13 Label2.Caption = "thirteen" Case 14 Label2.Caption = "forteen" Case 15 Label2.Caption = "fifteen" Case 16 Label2.Caption = "sixteen" Case 17 Label2.Caption = "seventeen" Case 18 Label2.Caption = "eighteen" Case 19 Label2.Caption = "nineteen" Case 20 Label2.Caption = "twenty" Case Else Label2.Caption = "unrecognize number" End Select


  • You can run your program by clicking Start button on your VB toolbar to check whether your program is correct or not.

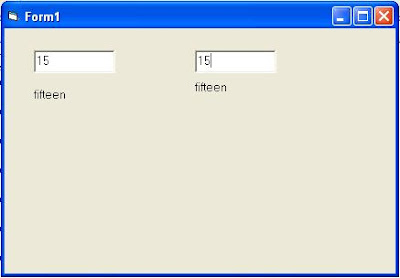
  • Type a number in Text1 box for example 15


  • Type a number in Text2 box for example 15

    If letter "fifteen" appears in both Label1 and Label2, it means that your program is correct, and running properly.


  • How to Convert Numbers into Letters in VB6 Programming?

    How to Convert Numbers into Letters in VB6 Programming?


    How to Copy Image or Picture to Clipboard in VB6 Programming?

    How to Copy Image or Picture ti Clipboard in VB6 Programming?


    Saturday, August 15, 2009

    If..Then..Else..End If in VB6 - Sample Programme 1

    If..Then..Else..End If in VB6 - Sample Programme 1


    If..Then..Else..End If Statement in VB6

    If..Then..Else..End If Statement in VB6 Programming


    Visual Basic Project Explorer Window

    Visual Basic Project Explorer Window


    Visual Basic Properties Window

    Visual Basic Properties Window


    Visual Basic Form Designer Window

    Form Designer Window in Visual Basic


    Visual Basic Toolbox

    Visual Basic Toolbox


    What's Visual Basic Development Environment?

    What's Visual Basic Development Environment?


    How to Save Your VB Programs?


    In the pervious posting I have written a tips how to start using VB6 programming software. When you open your VB program software a project (Project1) and a form (Form1) automatically created. These are your VB programs. However at the moment they just saved in the memory of your computer, so if suddenly your computer is off the program will loose from your computer memory. You can't use your program you have created next time before you save them into your disk. In order you can use your program next time you must save your program first. After that you can reopen, reuse and edit your programs whenever you want to.

    Now, how to save your VB program into your disk? Keep on reading below simple VB programming tips.
    It's just a simple way to do. It's a good thing before you save your programs, you have to define first "what's your VB project name", "what's your VB form name", and "where your program will be saved in(which folder)".

    For example you will save your program in a folder called D:\MyVBPrg, and your project name is MyFirstProj, and your form is MyFirstForm. Now, lets do the following instructions to save your VB program:
  • Open your windows Explorer, then create a folder called MyVBPrg in drive D: (mybe drive D:, E: etc depend on drive available on your computer)
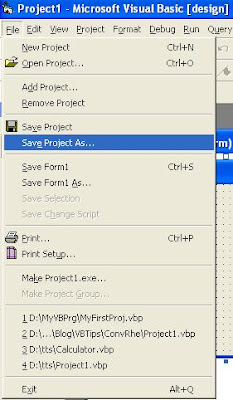
  • Click menu File on your VB design screen
  • Click menu Save Project As...
    Look at below screen shot.
    How to Save Your VB Program

    Then a Save File As window will appear on your screen.
  • Type MyFirstForm in the cell with label File Name:
    How to Save VB Program - Type Form Name

  • Click the cell with label Save in:
  • Choose the folder D:\MyVBPrg
  • Click Save
    How to Save VB Program - Select Folder

    Then a Save Project As window will appears on your screen
  • Type MyFirstProj in the cell with label File Name
  • Click Save
    How to Save VB Program - Click Save

    Now your program's been saved already in folder D:\MyVBPrg with file name MyFirstProj.vbp (a VB Project file) and MyFirstForm.frm (a VB Form file). The extention .vbp and .frm are automatically given by Visual Basic software. Look at below image for your illustration.
    This is your VB Program

    Have you any comment? Please write down your commant in below comment box.


  • How to Start Using VB6 Programming?


    Before you start using VB6 programming software, you must have a VB6 software installed in your computer with Operating System Windows family. To start using it you can follow below instructions.

  • Click Windows Start
  • Point to Program menu
  • Point to Microsoft Visual Basic 6.0 menu
  • Click Microsoft Visual Basic 6.0 program
    Please look at below image for your illustration:
    How to Open Your VB Software

  • Click Open
    Click the Project Type, then Click Open

    A VB project (Project1) and a Form (Form1) are automatically created. Now you are ready to design and create your VB6 program. Look at below picture for illustration.
    You can Develop your VB Application here

    What do you think?

  • Stop Dreaming Start Action

    Stop Dreaming Start Action


    Stop Dreaming Start Action is a phrase that be a key-word in a SEO contest that held by Jokosusilo.com website. Stop Dreaming Start Action is also a slogan of Jokosusilo's website, an Indonesian internet marketer. When the SEO contest starts so many Indonesian bloggers (estimated more than one thousand Indonesian bloggers) take place on the contest. The contest started on 20th June, 2009 and would finish on 15th September, 2009 at 09.00 Jakarta time. And the winners would be announced on the day. The registration would finish on 14th September, 2009 one day before the contest closed.

    Stop Dreaming Start Action itself means that we don't just dream, we must stop dream, however we have to take action as soon as to reach all of our will, to reach all of our dreams, to reach our success. Because nothing will happend without action. Success won't come itself without hard working. To reach our success we have stop dream, and take action with hard working.

    Everyone who health his/her body and mental must have goals, have desire. Also you and me with no exception must have desire, have dreams too. A goal would not come true by itself, unless with a real action, with hard working. You have to Stop Dreaming Start Action to achieve your goals.

    You have to Stop Dreaming Start Action. For example you want to be a rich man, it is imposible you suddenly will be the rich man. It is imposible just say "bim salabim abra kadabra" and suddenly a hill of money falling down in front of you, imposible man! To be a rich man you must learn more and more, you have to work hard, and save your money, so you will be rich.

    That is the mean of Stop Dreaming Start Action for me, stop your dreaming and start to take action in order all of your dreams come true. Every thing you want to achieve, you have to Stop Dreaming and Start Action as soon as. Ok, how about you... what is the meaning of Stop Dreaming Start Action? Have you done it? I hope it can be an inspiration for me, you, and all of us. Keep on Stop Dreaming Start Action.


    Indonesian language:
    Stop Dreaming Start Action merupakan sebuah frasa yang menjadi kata kunci dari kontes SEO yang diadakan oleh situs Jokosusilo.com. Stop Dreaming Start Action juga merupakan slogan dari situs Jokosusilo tersebut, salah satu internet marketer dari Indonesia. Ketika kontes SEO tersebut dibuka begitu banyak bloger dari Indonesia (diperkirakan lebih dari satu ribu blogger dari Indonesia) yang ikut ambil bagian dalam kontes tersebut. Kontes SEO tersebut dimulai pada tanggal 20 Juni 2009 dan akan berakhir pada tanggal 15 September 2009, pada jam 09.00 waktu Jakarta (WIB). Dan para pemenangnya akan diumumkan pada hari itu juga. Pendaftaran akan berakhir pada tanggal 14 September 2009, satu hari sebelum kontes ditutup.

    Stop Dreaming Start Action itu sendiri memiliki arti kita jangan hanya menjadi orang yang suka bermimpi, kita harus berhenti dari bermimpi, namun sebaliknya kita harus segera melakukan suatu tindakan untuk meraih semua keinginan kita, untuk mencapai semua impian kita, untuk mencapai kesuksesan kita. Karena tiada hal akan terjadi tanpa suatu tindakan. Kesuksesan tidak akan datang dengan sendirinya tanpa dibarengi dengan kerja keras. Untuk mencapai kesuksesan kita harus berhenti dari menjadi seorang yang hanya bermimpi, dan harus melakukan suatu tindakan dengan bekerja keras sekuat tenaga.

    Setiap orang yang memiliki kesehatan jasmani dan kesehatan rohani sudah pasti mempunyai cita - cita, mempunyai keinginan - keinginan. Begitu juga anda dan saya tanpa kecuali pasti mempunyai keinginan - keinginan, mempunyai impian - impian. Suatu cita - cita tidak akan tercapai dengan sendirinya, kecuali dengan suatu usaha yang sungguh - sungguh, dengan bekerja keras. Anda harus Stop Dreaming Start Action untuk mencapai cita - cita anda.

    Anda harus Stop Dreaming Start Action. Misalnya anda ingin menjadi seorang yang kaya raya, maka tidak mungkin dengan serta merta anda menjadi kaya raya. Tidak mungkin hanya dengan mengatakan "bim salabim abra kadabra" dan kemudian segunung uang tiba - tiba "GEDUBRAK" jatuh di hadapan anda, itu tidak mungkin dong! Untuk menjadi kaya - raya anda harus belajar dengan sungguh - sungguh dan bekerja keras dan harus rajin menabung, maka lama - lama anda akan bisa menjadi kaya.

    Begitulah dari sudut pandang saya bahwa Stop Dreaming Start Action memiliki arti Berhentilah dari menjadi seorang yang suka bermimpi dan mulailah berusaha agar mimpi - mimpi kita dapat menjadi kenyataan dengan cara bekerja keras. Terhadap segala sesuatu yang ingin anda capai, anda harus sesegera mungkin Stop Dreaming dan Mulai Melakukan Action. Ok, bagaimana menurut anda... apa arti dari Stop Dreaming Start Action? Apakah anda telah melakukannya? Saya berharap hal ini dapat menjadi inspirasi bagi saya, anda, dan kita semua. Tetaplah melakukan Stop Dreaming Start Action untuk menggapai cita-cita anda.


    Friday, August 14, 2009

    Table of Contents


    1. Stop Dreaming Start Action
    2. How to Star Using VB6 Programming?
    3. How to Save Your VB Programme?
    4. What's Visual Basic Development Environment?
    5. Visual Basic Toolbox
    6. Visual Basic Form Designer Window
    7. Visual Basic Properties Window
    8. Visual Basic Project Explorer Window
    9. Visual Basic Code Editor Window
    10. How to Place Controls into Form in VB6 Programming?
    11. If..Then..Else..End If Statement in VB6
    12. If..Then..Else..End If in VB6 Sample Program 1
    13. How to Copy Image or Picture to Clipboard in VB6 Programming
    14. How to Convert Numbers into Letters in VB6 Programming?
    15. How to Automate Convert Numbers into Letters in VB6 Programming?
    16. How to Convert Degree from Celcius to Another in VB6 Programming?
    17. How to Convert Degree from Fahrenheit to Another in VB6 Programming?
    18. How to Convert Degree from Rheamur to Another in VB6 Programming?
    19. How to Convert Degree from Kelvin to Another in VB6 Programming?

    20. Temperature Conversion with Multiple Base in VB6 Programming

    21. Select Case End Select - VB6 Sample Programme Part 1

    22. Select Case End Select - VB6 Sample Programme Part 2