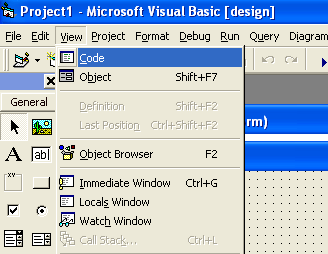
Friday, October 15, 2010
Printers - A Practical Buyers Guide - 1
Autosummarize from article “Printers - A Practical Buyers Guide” by Iggy Quazi
Printers have also become specialised for their intended purpose.It is no longer a case of "a printer is a printer".
Inkjet Technology
Inkjet printers form images by spraying tiny droplets of liquid ink onto paper. A quality inkjet printer can produce very near photo-quality images using specialist photo coated paper. Inkjet ink is specially formulated for specific printer models and their purpose, much technology is involved in the development of these inks to improve print quality, longevity, drying speeds and printing speeds etc. Inkjet printers use anything between two and eight ink cartridges to do their job. Inkjet printers are the best solution for most people and are usually the most cost effective way to print - unless you are printing large volumes.
Portable Inkjet Printers
These printers are small, lightweight and ideal for people on the move. Although the printing of high quality photographs is usually beyond this type of printer, basic colour printing is of good quality and the quality of text print is mostly outstanding considering the size of these tiny portable A4 printers. These printers are not suitable for high volume printing.
Inkjet Printers
The Inkjet Printer is the most commonly used type of printer among home and small business users. With excellent all round printing capabilities, from black & white text print and good colour prints through to very hi-resolution, high quality photographs using Inkjet Photo Printers. Multi-Function Inkjet Printers
Tuesday, April 13, 2010
8 Basic Steps to Create a Program in Visual Basic

Visual Basic is one of even-driven programming. Creating an even-driven programs like Visual Basic requires different approach from that used in procedural languages. The approach may seem unusual, if you are experienced with procedural programming.
Here are 8 basic steps in creating an application with Visual Basic:
1. Create a Design Plan
2. Create the user interface
3. Set the properties of interface objects
4. Write code for events
5. Save the project
6. Test and debug the application
7. Make an executable file (by compiling it)
8. Create a setup application
Friday, April 9, 2010
How to Name Objects in VB6 Programming ?
When an object is created, a default name based on its object typed will be given to the object. For example Form1 will be given to object/control with type Form, Text2, Text3,... will be given to Textbox object, Command1, Command2,.... will be given to command button object. You should immediately change the name property of the object to a name that describes the purpose of the control. Changing the Name property of your object with a name that describe the purpose with the object will make the code in your application easier to read and debug.
Visual Basic has several Standard Naming Convensions. Although you can assign any name you want to an object, but it is a better to adopt a naming convension and use it ocnsistently throughout your programms. Because it will make easier for others to understand your code.
Here it is a list of Standard Naming Convensions used in Visual Basic that assign to each type object:
The prefix you should use: chk
Example name: chkDrink
The prefix you should use: cbo
Example name: cboStore
The prefix you should use: cmd
Example name: cmdSelect
The prefix you should use: dat
Example name: datSales
The prefix you should use: dir
Example name: dirImage
The prefix you should use: drv
Example name: drvSource
The prefix you should use: fil
Example name: filSource
The prefix you should use: frm
Example name: frmEntry
The prefix you should use: fra
Example name: fraOption
The prefix you should use: grd
Example name: grdItem
The prefix you should use: hsb
Example name: hsbTemperature
The prefix you should use: img
Example name: imgEmployee
The prefix you should use: lbl
Example name: lblName
The prefix you should use: lin
Example name: linHorizontal
The prefix you should use: lst
Example name: lstCustomer
The prefix you should use: mnu
Example name: mnuReport
The prefix you should use: ole
Example name: oleObject2
The prefix you should use: opt
Example name: optCountry
The prefix you should use: pic
Example name: picFlower
The prefix you should use: shp
Example name: shpSquare
The prefix you should use: txt
Example name: txtName
The prefix you should use: tmr
Example name: tmrStep
The prefix you should use: vsb
Example name: vsbRate
Saturday, April 3, 2010
How to Return Property Values in VB6 Programming?
It is often needed to return property value of an object to perform a calculation or some other task in your Visual Basic Application. And in the most previous sample program I've written use this way to perform some calculations, and also some other tasks. For example in the sample program of How to Convert Degree from Celcius to Another in VB 6 Programming? also returning property value to be calculated, and then the result of calculation to set the property value of other object.
To return the value of an object property, you can use below syntax:
Variable = Object.Property
Or
Object2.Property = Object1.Property
Note:
You can use the first syntax if you want to return the value of an object property into a variable, so the value will be kept in the variable.
You should use the second syntax if you want to return the value to set another object property value.
In the most sample program I've written in the previous postings use the second syntax to return value of an object property and perform the calculation, then the result kept as value of another object property.
Notice below sample code:
Text2.Text = Val(Text1.Text) * 1.8 + 32
The value of Text1.Text is returned and used as an operand in the calcuation phrase and the result of calculation then used as value of Text2.Text. In this example you don't need a variable to keep the calculation result.
Another example code:
strName = txtName.Text
lblName.Caption = txtName.Text
Any comment? Please leave it in the below comment box.
Tuesday, March 30, 2010
Setting Object Properties at Run Time in VB6 Programming
In the previous posting you have learnt how to set object properties at design time, by clicking the object you want, then change/set the value of property in the properties window. In this posting I'll write how to set/change property value at run time (when program running). And also I'll give you a sample program (code).
Below is the syntax how to set an object property at run time:
Object.Property = Expression
For example:
Below statement will set Caption of lblName with "John Smith" at run time.
lblName.Caption = "John Smith"
However not all object properties can be set their values at run time, because some object properties can be set just at design time. In the next posting maybe I'll write lists of which object properties that can be set just at design time, which ones that can be set just at run time, and which ones that can be set both at design time and run time.
Monday, March 29, 2010
Setting Object Properties at Design Time in VB6

In the previous posting I've written that you can set the properties of an object at design time. The properties settings that you establish at design time are used as the initial settings each time your application runs. You can set the object properties by using Properties window.
Although it is not a must, because you set the properties of course according to your need. But some properties usually you set them at design time, such as:
BackStyle
BorderStyle
Caption
Enabled
FillColor
FillStyle
Name
Visible
How to set the value of property at design time, you can follow below steps:
Visual Basic will activate the form or control, and displays the property for the object.
Some property values can be selected from the list, but others must be typed.
Sunday, March 28, 2010
A Tips to Create a Function to Convert Numbers into Roman Numerals
To create a number of letters we often use roman numerals to indicate the month of making the letter.For example, the letter number is '001 / Int/III/2010' where the symbol 'III' indicates that the letter was made in March 2010.
For this we need a function that can convert an integer number from 1 to 12 into roman numerals. In the Visual Basic programming, we can easily create such a function. Well, here we'll show an example program to create such functions, as well as examples of how to use it.
Function IToR(i As Integer) As String
   Dim s As String
   s = "I   II  III IV  V   VI  VII VIIIIX  X   XI  XII "
   IToR = Mid(s, (i - 1) * 4 + 1, 4)
End Function
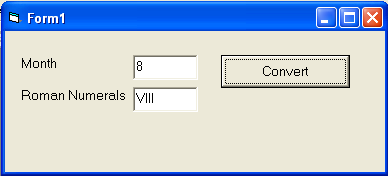
So your Screen design will look like the image below:
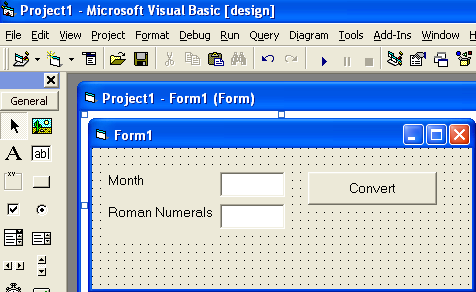
Private Sub cmdConvert_Click()
   txtRomNum.Text = IToR(Val(txtMonth.Text))
End Sub
Okay, you have completed the program
Now it's time to test
- Run your program
Consider the results